|
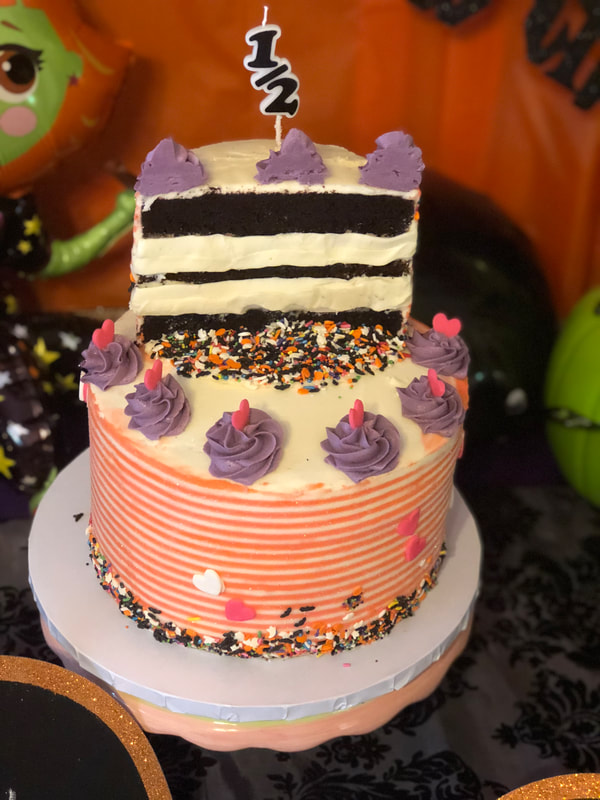
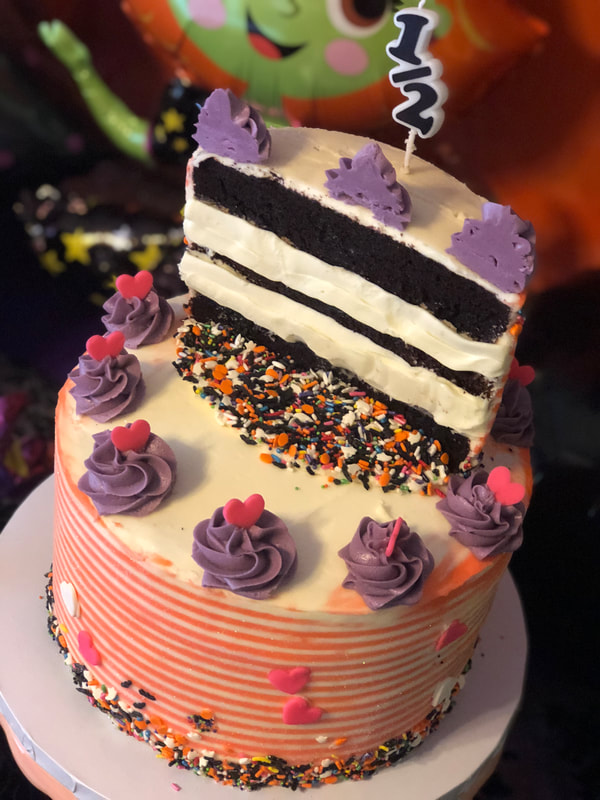
I know I know I have been MIA again with my posting but I have made a bunch of new cakes that are so out of my comfort zone so just be prepared. I have finally done the one cake I was most nervous about...a half birthday cake! Is there anything more exciting than seeing a vision in your head and it coming true in cake form? NO! Literally NO! If you have been following this blog than my twin nieces are now 6 months...YAY to that! It happens so that their half birthday was the weekend of Halloween, my most despised holiday by far. Do not get me wrong all you pumpkin spice lovers, I love that part I just hate anything and everything scary; flashing lights, scary movies, masks, clowns, the works. So to say the least I was stumped as to what to make for a Halloween themed party to celebrate their half birthdays so I made it as fun and whimsical as possible. For this tiered cake I made 6 pounds of my chocolate cake and 4 pounds of my moist Vanilla cake (recipe is from Howtocakeit.com) layered with American Buttercream. This cake and a half gets a healthy dose my very own sprinkles mix but any sprinkles in any colors work too. I also dabbeled a little in fondant and made some fondant hearts using cookie cutters.
Tools: Electric stand mixer fitted with a paddle attachment Cake pans (for this recipe I used 2 9x13 round cake pans and 1 7x13 round pans) Whisk Spatula Parchment Paper Bench Scraper Cake comb (to make the stripes) Offset spatula Piping Bags Wilton 1M tip Signature Vanilla Cake You'll need: 2 1/2 cups of All Purpose flour 2 cups of granulated sugar 2 1/2 tsp of baking powder 1 tsp of table salt 4 tsp pure vanilla extract 4 large eggs, at room temperature 1 cup of whole milk 1 cups (2 sticks) of unsalted butter, at room temperature Chocolate Nutella Cake You'll need: 5 1/2 cups of All Purpose flour 4cups of granulated sugar 4 tsp of baking powder 3 tsp baking soda 2 tsp of table salt 8 large eggs, at room temperature 2 cups Cocoa Powder 2 cups (4 sticks) of unsalted butter, at room temperature 5 cups of boiling water 5 tablespoons of Nutella American Buttercream: You'll need: 8 sticks or 2 cups (434 grams) unsalted butter, room temperature 16 cups (2 2LB bags) powdered sugar 1 tsp (6 grams) salt 4 Tbsp (60 grams) heavy cream 6 tsp (12 grams) vanilla *First start with baking the cakes. You will be using 2 9in pans for the vanilla and 2 9in pans for the chocolate. You will also be using 1 7in pan for top tier. *The chocolate recipe above will make more than you need so after you fill you 2 9 in pans and 1 7 in pan you will have enough for 24 cupcakes or 48 mini cupcakes. Vanilla Cake: Preheat your oven to 350 degrees Fahrenheit. Line your pans with parchment paper. Sift the flour, baking powder, and salt into a bowl and whisk together. Set it aside. In the bowl of a stand mixer fitted with the paddle attachment, beat the butter, sugar, & vanilla on medium speed until the mixture looks fluffy. Add the eggs, two at a time, beating until each addition is well mixed. You can use your spatula now to scrape down the sides of the bowl, if necessary. Adding the dry and wet ingredients: Add the flour mixture in 4 parts, alternating with the milk in 3 parts, beating just until each addition is mixed well before adding the next, try not to over mix it. Bake for 40 mins or until a toothpick inserted in the middle of the pan comes out clean. Chocolate Nutella Cake: Sift the flour, baking powder,baking soda, and salt into a bowl and whisk together. Set it aside. Put the cocoa powder in a medium heat proof bowl. Bring 5 cups of water to a boil, the carefully (here is where I burn myself) measure exactly 4 cups and pour over the cocoa powder and whisk until smooth. Set aside to cool. In the bowl of a stand mixer fitted with the paddle attachment, cream the butter and sugar on medium speed until the mixture looks fluffy. (they say about 8 mins but I don't have time for that) Add the eggs two at a time beating until each addition is well mixed. You can use your spatula now to scrape down the sides of the bowl, if necessary. Adding the dry and wet ingredients: Add the flour mixture in 4 parts, alternating with the warm cocoa mixture in 3 parts, beating just until each addition is mixed well before adding the next, try not to over mix it. Bake for 40 mins or until a toothpick inserted in the middle of the pan comes out clean. *half way through the baking time rotate the pans in the oven so they bake evenly* Once fully baked, transfer to a wire rack or set them aside to cool completely. I always store my cakes in the fridge or you can plastic wrap and freeze them. These cake can be made in advanced and can be put into the refrigerator. I usually just bake mine and cool them in the freezer. This step is crucial as frosting a warm cake can lead to a messy pool of buttercream and no body has time for that! To make the American Buttercream: Beat the butter on a medium speed for 30 seconds with a paddle attachment, until smooth. Slowly add in the powdered sugar, 1 cup at a time. Alternate with small splashes of cream. Once fully mixed, add in the vanilla and salt, and beat on low until the ingredients are fully incorporated, and the desired consistency is reached. If the frosting is too thick, add in additional cream (1 teaspoon at a time). Since this cake has stripes, I reserved half of my buttercream and with gel food coloring I mixed the remainder into a peach. To get this color i mixed 3 drops of pink and 1 drop of orange gel food coloring until I achieved the right color. I wanted it to be girly and Halloween-y all at the same time. Stacking and Layering: Once cakes have cooled completely , remove them from their pans and level the tops. Cut each cake into two layers. Using a ruler cut your 7 in cake round in half. Viola! you have your half top tier! Stack and fill you 9 in cakes with American buttercream alternating vanilla and chocolate layers & cleaning the sides with a spatula as you go. Repeat this process with your half 7 in cake round layers making sure to keep the straight end clean of excess buttercream. Crumb coat your cakes with the plain white buttercream but remember DO NOT crumb coat the straight edge of your half cake! Chill for 20 minutes. Ice your cakes using more plain white buttercream, using a bench scraper to keep everything smooth and chill for another 20 minutes. Apply another layer of plain white buttercream to your cakes and use a cake comb to create a striped pattern. It is helpful to have a turntable or lazy susan for this and also a thick and I mean THICK layer of buttercream so that your not scraping off buttercream and revealing your cake. Once your hapy with the stripes chill once more. Now, with the peach buttercream, apply a thin layer to your cakes using a bench scraper to remove the excess and reveal the striped pattern. Using a long knife and a ruler as your guide, remove a think slice from the front of your half cake so that you have a clean edge. I did this about 2 times until i got a smooth center and filled in the layers with more buttercream for an added effect. ALSO CHILL YOUR CAKE. The colder it is the better. Take a handful of sprinkles of your choice, I actually mixed up my own batch by mixing a bunch of Halloween and fall colors together and made my own little sprinkles medley. I did this only 1/3 of the way up and gently pressed them into the cake. Move your bottom tier to its final serving dish before using a template of your half cake to mark out where dowels will need to be place. Insert one dowel into your cake, and mark where it meets the top. Use as a guide to cut all dowels down to size before inserting into your cake, and then place your half tier on top. Fit your piping bag with a 1M piping tip, and fill with plain white buttercream. Pipe stars onto a piece of parchment paper and chill in freezer. Once chilled cut them in half to place on top of your half cake to make it look like it was cut in half on purpose. To address the slight bit of cake board that is visible on your half tier, use a stencil to lay out a bed of sprinkles and camouflage this area. I then rolled out some pink fondant and cut of heart shapes with a mini cookie cutter and inserted them in my star spirals around my cake. Congrats! If all went well please let me know in my comments and remember that this should be fun and not stressful. Adjust the recipe as you see fit, change the colors and the sizes of the pans, heck skip the stripes and pipe roses around the cake like I did in my pistachio cake. Let your creativity soar.
0 Comments
Leave a Reply. |
Stay Tuned..Cake Pops and more... Archive
December 2018
|


